By Edwina Ducker
Driven by the loss of one of my foot pegs last summer and a deep seated, embarrassing urge to have the latest thing/gear like all the cool kids on the block, I decided to replace my pegs with foam over the winter.
As a complete novice, I seriously questioned my ability to do this as I have no tools or prior experience with adapting my kayak. I have documented my process in the hope that what I discovered in my journey may be helpful to others. I call it “The blind leading the blind”
Prepare, Prepare, Prepare
First, I reviewed all the chat forums and talked with everyone in the club that had completed this task. One of the most helpful piece of advice I got was: “I got the foam blocks and used my feet to push it deep into the bulkhead until I filled it to where it needed to be.”
It was recommended by the chat forums to use Minicell foam that comes in assorted size and can be purchased from multiple places, for example, NRS or Amazon. The next question was, how much do I buy and in what size?
To calculate how much I needed I measured the space from the bulkhead to my positioned pegs,
Step 1. Height 9.25” which stayed the same,
Width 16”- 19” from bulkhead to pegs,
Length from bulkhead to pegs 9.5”
This gave me 3 foam blocks of 3” thick * 24” wide = 9” to the peg with an additional 1” *24” for wiggle room and my use of very approximate measurements.
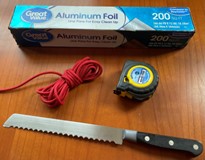
Step 2. Make a template of the bulkhead. I used aluminum foil as it was the easiest to manipulate and yes you need long arms for this step. Ok now you have all the measurements you need, next step your pegs.

The Pegs: To remove or not remove. I was unable to remove my pegs. So I just pulled them as far up to my seat as possible. I recommend you remove them if you can as it makes life a lot easier. There is no need to remove the rail as the foam will slide past it easily and you may need it in the future.
In the chat forums someone suggested pushing the pegs down as close to the bulkhead as possible, they would help to support the foam and you would use less foam.
Lesson Learned. Do not try this, it resulted in the foam bowing in the middle and did not creating a flat wedge.
By the time I on the 3rd foam block the sizing and the feel of the foam did not feel comfortable. The one things people love most about the foam insert, “you can position your feet wherever they feel comfortable at the time while paddling” . I felt with the “bow” I could not get my feet comfortable, my leg length was off and I would have to make a decision where to stick the addition pads for best foot positioning to paddle. By the time I realized this it was too late, I had to removed all the foam and start again.
Step 3. Now you are ready to rock and roll.
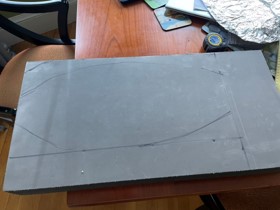
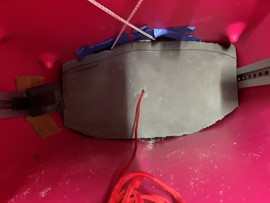
Using the bulkhead template, draw the outline on a piece of your foam. (figure 3,4)
Step 4. The first Cut. This is where the kitchen knife comes into action. I realized early on, I did not have any fancy cutting tool for the foam and so I decided to try using the bread knife. It was incredibly successful, the edges might be a little ragged but who cares, you are just shoving it into the bulkhead and who is looking anyway?
Initially, I cut out the 9*16 block (figure 5) and then used the template to shape it to fit into the bulkhead. (figure 3, 4, 6). The template helped me made decisions on how much to cut/shape the foam to fit the space. I feared if I sized it to small it would not stay wedged in the space and I would have to use glue or order another piece of foam.
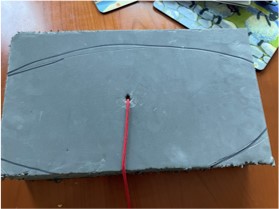
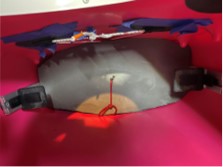
Now this is where this piece of advice come in “ I got the foam blocks and used my feet to push it deep into the bulkhead until I fitted it to where it needed to be” (figure 6) and that is exactly what I did. Great feeling of satisfaction to get the first piece wedged in. Be aware, even thought I had moved the pegs up as high as possible it did take a bit of maneuvering and pushing to get the foam past the pegs.
Step 5. you are probably asking yourself what that piece of red cord is doing there. On one of the chat rooms it was suggested you thread a piece of cord thru the foam so it is easier to pull them out if it is needed. They also suggested you made a ridge on the bottom, of the blocks to allow water to run out but as you can see from the picture just the act of cutting/shaping does that very nicely on its own.
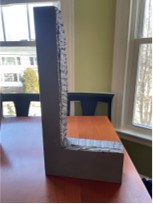
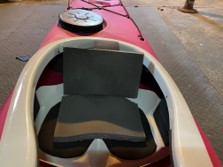
Step 6 Cut the final 2 pieces of foam to the size you need based on your measurements. Remember my bulkhead went from width 16”- 19”, I used the template as a guide and adjusted according to the width. You can see in (figure 4) it used almost all the width of the foam. Then as before just use your feet to shove it into the bulkhead. Note the foot pegs are as far up as possible they do not get in the way but I will need someone with the correct tool to remove the screws so I can get them off. (figure 7)
I used the 3 foam blocks and had the 1” piece left over which I used to pad my seat. I used H2 glue and as per the instructions it gets tacky very fast and sticks like magic. The instructions also says, you may have to add a number of coats to the foam to get it to stick, I only used 1 coat.
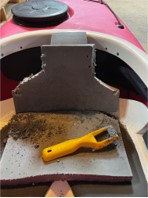
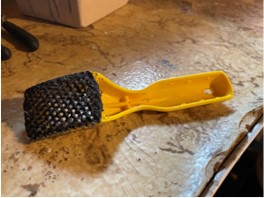
I used the Stanley 21-115 Surfoam Shaver and the kitchen knife to shape the seat. The shaver is used to shape wood but it works just as well with foam. (figure 9,10). Thank you to Kevin Beckwith for that very useful piece of advise.
I hope this was helpful to someone and if you have any questions, well you know where I will be, in my kayak on the water. Or Edwina Ducker
Cell: 207-692-4243
Email: [email protected]